Setting Up Hexo on Raspberry Pi 4B
Setting Up Hexo on Raspberry Pi 4B (Part 1)
Introduction
Hexo is a fast, simple, and efficient blogging framework. Hexo uses Markdown (or other rendering engines) to parse articles. Within seconds, it generates static web pages using beautiful themes, converting your markdown files into static websites according to the specified theme.
Preparations
Hardware:
- Raspberry Pi 4B
- 16(GB) SD card
Software:
- RASPBERRY PI OS LITE (64-BIT)
- Public IP + DDNS from China Telecom
- node.js + Git
Installing Hexo
Before installing Hexo, you need to install npm and node.js on your Raspberry Pi (usually npm is installed along with node.js).
To check if hexo and npm are installed, run the following command:
1 | ~ node -v && npm -v |
Use npm, the package manager for node.js, to install Hexo with the following command:
1 | ~ npm install -g hexo-cli |
To verify the installation, run:
1 | ~ hexo -v |
If version information appears, the installation was successful.
Generating Web Pages with Hexo
Once both tools are ready, we can begin generating static web pages.
First, create a folder to store the website data:
1 | ~ mkdir /home/hexo |
Here is the translation of the content you provided:
Then, the folder will contain Hexo’s source code.
This is the root directory of the website.
To generate code with Hexo, use the following command:
1 | hexo g |
Then, start the local server to access the website:
1 | hexo server |
In the browser, enter the following to access the Hexo-generated webpage locally:
1 | localhost:4000 |

Hexo Structure Explained
_config.yml
This file contains the website’s configuration. Most of the parameters can be configured here. Configuration Guide
package.json
Information about the application and the required modules to be installed.
scaffolds
The scaffold folder contains templates. When a new post is created, Hexo uses the files in this folder as a template for the new file. Hexo’s template refers to the default content that is filled into the newly created markdown file. For example, if you modify the Front-matter content in scaffold/post.md, every new post will include this modification. In other words, every time you create a new post using Hexo, the content from the specified template file will be included.
source
The source folder is where user resources, like markdown posts, are stored. Markdown and HTML files will be parsed and placed into the public folder, while other files will simply be copied there.
Note: Except for the
_postsfolder, files or folders whose names begin with an underscore (_) and hidden files will be ignored.
themes
The theme folder. Hexo uses themes to parse markdown files in the source directory and generate static pages. Official Theme Explanation
Writing Posts
You can create a new post using the following command:
1 | $ hexo new [layout] <title> |
You can specify the layout of the post in the command. If not specified, the default layout is post, which can also be set in _config.yml under the default_layout parameter. The newly created post will automatically include the content from the template file corresponding to the specified layout.
Layout
Hexo comes with three default layouts: post, page, and draft, each corresponding to a different path. Custom layouts will be stored in the source/_posts folder, similar to the post layout.
Layout Paths:post — source/_postspage — source/_pagesdraft — source/_drafts
If you don’t want your post to be processed, you can set
layout: falsein the Front-Matter.
Scaffold
When a new post is created, Hexo generates the file based on the corresponding file in the scaffolds folder. For example:
1 | $ hexo new photo "My Gallery" |
When executing this command, Hexo will look for photo.md in the scaffolds folder and create the post according to its content. Here are the variables you can use in the template:
| Variable | Description |
|---|---|
layout |
Layout |
title |
Title |
date |
Date the file is created |
Front-matter
Front-matter is the area at the top of the file, separated by ---, used to specify variables for individual files. For example:
1 | --- |
Note: Front-matter usually uses YAML syntax, which requires attention to spaces, such as
title: Hello World, where a space is needed after the colon. Besides YAML, you can also use JSON to write Front-matter.
Below are predefined parameters, which can be used in the template and utilized.
| Parameter | Description | Default Value |
|---|---|---|
| layout | Layout | |
| title | Title | |
| date | Creation date of the file | |
| updated | Update date of the file | |
| comments | Enable comments for the post | true |
| tags | Tags (not applicable to pages) | |
| categories | Categories (not applicable to pages) | |
| permalink | Override the post URL |
Here’s the translation of the content you provided:
Categories and Tags
Only posts support categories and tags, and you can set them in the Front-matter. In other systems, categories and tags may seem similar, but in Hexo, they have a clear difference: Categories are ordered and hierarchical, while tags are not.
1 | categories: |
WordPress allows setting multiple categories for a post, and those categories can be at the same level or in a parent-child relationship. However, Hexo does not support specifying multiple categories at the same level. The following specification:
1 | categories: |
will make the category Life a subcategory of Diary, rather than a parallel category. Therefore, it’s important to choose the most accurate category for your post.
Post Excerpt
To set a post excerpt, simply add <!-- more --> after the content you want to display as an excerpt, like this:
1 | --- |
This way, the content before <!-- more --> and after the document’s configuration parameters will be rendered as the post excerpt on the site.
Note! The post excerpt will be the first part of the content on the post details page.
Resource Referencing
When writing a blog post, sometimes you may want to add images or other resources. There are two ways to do this:
- Use absolute paths to reference resources, which is the URL of the resource in the web world.
- Use relative paths to reference resources.
For referencing resources using relative paths, you can use Hexo’s resource folder feature.
Open the _config.yml file in the root directory of your site with a text editor and set the post_asset_folder value to true.
1 | post_asset_folder: true |
After this change, Hexo will enable the post asset folder management feature. Every time you create a new post using the hexo new <title> command, Hexo will automatically create a folder with the same name. You can then place the related resources for the post in this folder and reference them using relative paths. For example, if you put an example.jpg image in this folder, you can reference it with the relative path using the standard markdown syntax: .
Publishing the Website
First, run the following command to generate the static web pages. The generated static pages and related resources will be in the public directory.
1 | $ hexo generate |
Using hexo-server
The main command for the hexo-server module is as follows. Run the following command to start the server, and your site will be available at http://localhost:4000. While the server is running, Hexo will watch for file changes and automatically update, so there’s no need to restart the server.
1 | $ hexo server |
If you want to change the port or encounter the EADDRINUSE error, you can specify another port using the -p option, as shown below:
1 | $ hexo server -p 5000 |
However, I personally think this method is more suitable for debugging the website and not for long-term use as a web server. Additionally, to run this command in the background for extended periods, a corresponding script needs to be written.
Editing Your Own Blog
How to Add Your Own Blog Post
For example, to create a new blog post titled “my_blog”, run the following command: hexo new 'myblog'.
After the command is executed, check the source/_post folder, and you’ll see that the myblog.md file has been generated.
Here’s the translation of the content you provided:
Finally, restart Hexo, and you’ll be able to see the site!
1 | ~ hexo g |
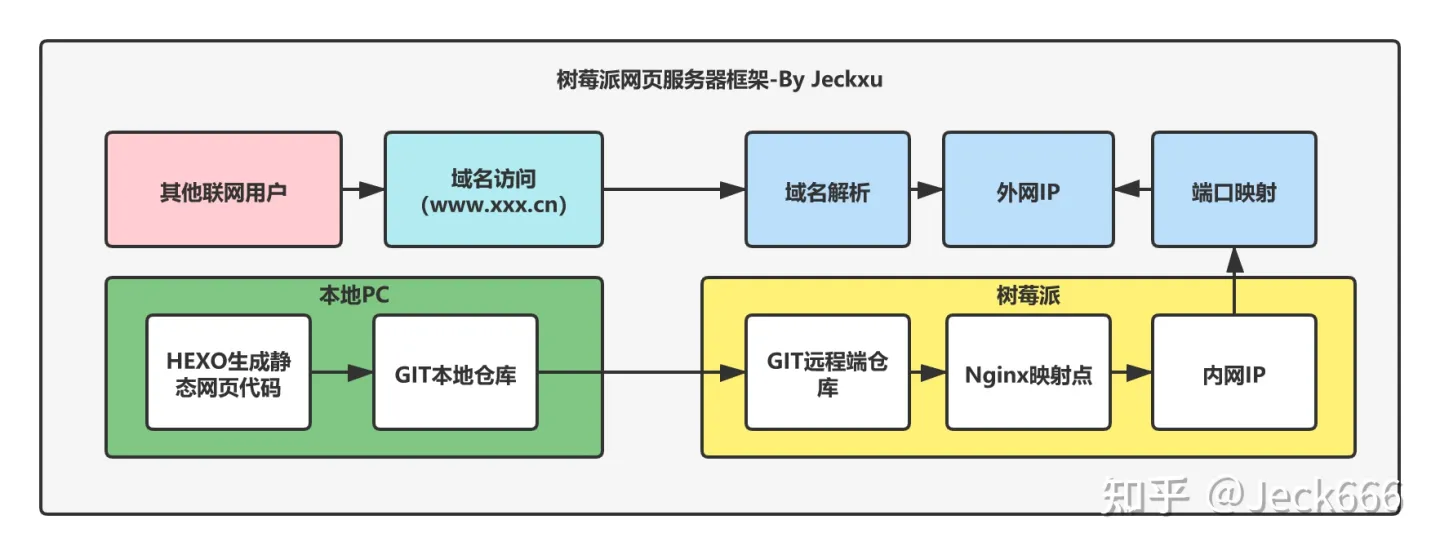
Blog Deployment
Install Nginx
1 | sudo apt-get install nginx |
Start Nginx
1 | sudo nginx start |
Starting, Stopping, and Reloading Nginx Configuration
To start nginx, run the executable. Once nginx is running, you can control it by invoking the executable with the -s parameter. Use the following syntax:
1 | nginx -s signal |
The value of signal can be one of the following:
stop- Quickly shuts down the servicequit- Gracefully shuts down the servicereload- Reloads the configuration filereopen- Reopens the log files
For example, to stop the nginx process and allow it to finish handling current requests, you can execute the following command:
1 | nginx -s quit |
Note: This command should be executed under the same user that started nginx.
Configuration file changes will not be applied until the reload or restart command is sent to nginx. To reload the configuration file, execute:
1 | nginx -s reload |
When the master process receives the signal to reload the configuration, it checks the syntax validity of the new configuration file and attempts to apply the configuration provided. If successful, the master process starts new worker processes and sends a message to the old worker processes, requesting them to shut down. Otherwise, the master process rolls back the changes and continues using the old configuration. The old worker processes, upon receiving the shutdown command, stop accepting new connections and continue handling the current requests until all are processed. Afterward, the old worker processes exit.
Deploying Static Pages
After installing nginx, check its installation location (which may vary depending on the version):
1 | whereis nginx |

/usr/sbin/nginxis the location of the executable command./etc/nginxis the location of the nginx configuration files.
(1) How to Deploy Pages
Enter the /etc/nginx folder. The focus is on the sites-available and sites-enabled directories.
sites-availablemeans “available sites.”sites-enabledmeans “enabled sites.”

After logging into the server using an FTP tool, you’ll see that there is a default site under sites-enabled, but it has an icon that looks like a shortcut. This is actually a symbolic link pointing to the file in sites-available.
Tip: When we modify the default file in sites-available, the default file in sites-enabled is updated as well.
We can directly modify the default file in sites-available to set up the first site. Below is what the default settings look like when opened with the vim command (if you’re unfamiliar with vim commands, you can download the file using an FTP tool, modify it, and then upload it back).

Here:
listen 9999: Specifies that it listens on port 9999.root /var/www/html/bigDataweb: Specifies that the site directory is located in the/var/www/html/bigDatawebfolder.
Therefore, all we need to do is replace the path with the location of the
publicfolder from our blog setup.
 wechat
 alipay